Hey guys, it’s Akash! I take pretty much all of Summer’s photos and I also do some freelance work on the side. Summer asked me to answer a few of the questions a lot of you guys have asked about what kind of camera and lens we use, why, etc. So today’s post is going be all about the fun stuff behind the scenes: everything you need to know about what camera gear I use for blogging!


For those of you who want quick answers, here’s the quick breakdown of what camera gear I use!
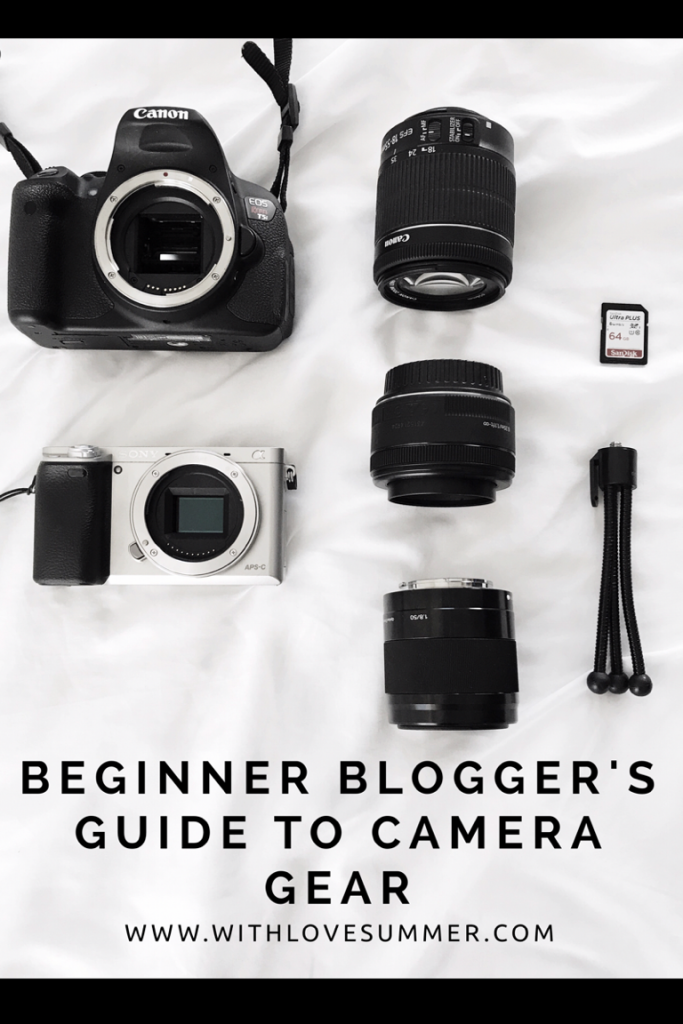
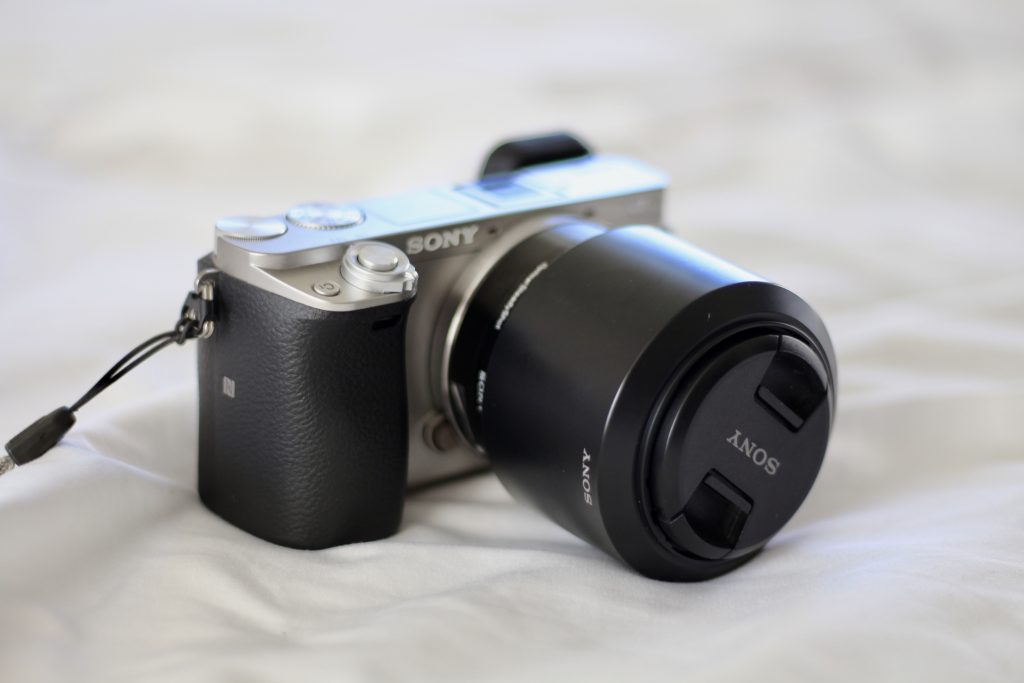
Camera: Sony a6000 (crop sensor, 24 megapixel, mirrorless)
Lens: Sony 50 mm f1.8 (E mount, OSS)
Editing Software: Lightroom
For those of you who are looking to get into photography or just want to take a deeper dive into why we use the equipment we use, here you go!
Quick disclaimer: I am by no means an expert on any of the things I am about to discuss. However, I have looked extensively into the gear I use. Every piece I own is there for a good reason, specifically for how I use them. With that being said, along with this guide, I encourage anyone to do their own research and find what works best for them for their own use. Anyways, onto the good stuff!
CAMERA BODY
So, the Sony a6000 is perfect for taking portraits. It has so many features that other Nikon and Canon cameras in similar price ranges just don’t have. I honestly couldn’t list off everything the Sony has that the other cameras don’t, but I will list the features the Sony has that makes the life of anyone taking pictures of people so much easier.
Facial Recognition/Tracking: You might think “It’s 2017, all cameras can do that”, right? Nope, they can’t. The Sony will recognize a face and will constantly keep that face in focus even if it moves. When you shoot with a Canon or Nikon, you have to aim a part of the lens to the spot you want to focus on, then recompose to frame the shot properly. For us, this used to be a huge hassle (back when we used the Canon to shoot) especially when it was windy and Summer’s hair was only set for a split second before being blown away.
Also, when it’s super hot and Summer’s in a coat or something so we just need to finish as soon as possible. Oh and not to mention, Summer tries a lot of different poses, so she’s moving between every single shot. So when using the Canon, I’d have to recompose every time! But with the Sony, it tracks her face with speed and precision constantly and it speeds up our shooting time a lot. This would also be a good time to say that the Sony a6000 has some of the fastest auto-focus capabilities compared to any camera in the market in its range, and possibly even above its range.
Eye tracking: Facial recognition is amazing and saves a ton of time. However, on closer shots like when I do close ups or professional shots for clients, I want to know that the photo is focused exactly on the eye of the subject. The Sony can detect and focus on the eye of a subject. I mean how great is that. This ensures my focus is on point and it is so much faster than recomposing. Again, another amazing feature.

Live Preview: Since the Sony is a mirrorless camera, along with being a lot slimmer and lighter than others, the display in the eyepiece and on the back of the camera shows you how the photo will actually look with the current settings. This feature seems like a no brainer, but believe it or not many DLSR’s still don’t show you how your picture is going to look until you actually look at it in playback.
This feature is standard on all mirrorless cameras. I believe. It helps so very much when taking photos because I know before I take the photo that what I am seeing is what the picture is going to look like. Once again, amazing feature. So helpful.
11 FPS Shooting w/ Focus Tracking: You might have seen a few spinning pictures, or walking pictures, or basically movement that is frozen in a picture on Summer’s blog, right? Well, this is how we do it. The Sony can shoot at 11 FPS while keeping and updating focus on whatever you locked on to, or whatever is closest to the lens, or the face the it is detecting, you can choose (Oh and, the Sony allows you to lock onto any object and it will automatically track it even if exits the frame and re-enters.)
In case anyone didn’t know, 11 FPS is how fast top of the line Canon and Nikon DSLR cameras can shoot at. It’s very fast and perfect for getting those action shots or catching those moments that only come once like a very genuine laugh or a special moment between family members when you’re shooting a client. I honestly don’t know why anyone would buy another camera for this kind of work at this level.
Price: This one’s actually not really a feature, but it is a very important factor. The a6000 is getting a little old and there are newer, better versions of this camera in the Sony mirrorless lineup like the a6300 and a6500. However, it continues to be one of Sony’s best selling cameras and a very popular item on Amazon because it is still an extremely capable camera and it is cheaper than many DSLR’s in its class. The later iterations of this camera (a6300, a6500, etc.) are even better than this camera by the way, but much more expensive so that’s why I didn’t buy those.
If all that sounds great to you, let me tell you that it is even better experiencing it. And that’s not even all of the great features of the a6000. There’s Soft Skin Mode, Priority Facial Recognition, Kelvin, Enhanced Manual Focus, NFC and WiFi transfer capabilities, and so much more. I am not exaggerating when I say its amazing that this camera exists and people actually opt to buy other cameras. In any case, on to the lens!
LENS

This explanation is going to be much shorter than the last one. The lens I use for all of Summer’s photos and really all of my freelance work is the Sony 50 mm f 1.8 lens. You might be wondering what the numbers mean so I will give you a quick rundown. The 50 mm is referring to the focal length of a lens. The f1.8 is referring to the aperture of a lens. To keep this post from becoming too long and possibly too technical for the average reader, I would just say it’s easier to Google those terms. No worries, it’s pretty straight forward.
I should also point out that this lens is a prime lens, meaning it does not zoom. Some people have a problem with this, but I actually really like it. It has never truly hindered taking pictures for Summer or any of my clients. In any case, here are the 4 reasons why I chose this lens:
Low Aperture: f 1.8 is considered to be a very low aperture which basically means your pictures will have blurry backgrounds. That’s pretty much it. The other benefit worth mentioning is that the lower the aperture, the more light the lens can take in. This just meansmeans you can shoot in darker settings, which actually is really useful. A low aperture lens is a must for any portrait shooter. Some people complain about focusing with lower aperture lenses, but with the focusing capabilities of the a6000, there are no issues.
Medium/Versatile Focal Length: The focal length of 50 mm on a crop sensor camera makes for a very versatile focal length. If you don’t know what I mean/why focal length matters, just Google it-it’s super simple! In any case, this focal length can be used for many different shoots, but is especially good for portraits. And that’s the main reason I have it because I mainly do portraits. To be fair, I have wanted a wider lens like a 30 mm or 35 mm lens multiple times, so that’s also an option.
Picture Quality: After you’ve tried a few lenses, you’ll notice not all lenses and glass produce the same quality. However, a lot of times it’s not that easy to tell which lenses are sharper than others.
To help this, check out the site www.dxomark.com. They run very technical and in-depth tests on the lenses and cameras they review and their results are highly trusted in the photography community. If you look up the lens I use on the site, you’ll see that it’s tied for the sharpest lens that can be used natively on the a6000. The other lens it is tied with is more than triple the price of this one. The sharpest and very affordable, how could I not choose this one!
Price: I touched on this in the last point and yes, it is very affordable. It even comes with internal stabilization (which is what the “OSS” means.) That means that the lens can still take fairly sharp pictures even when the camera isn’t perfectly still. And if you’re like me, you can buy just the a6000 body alone and this lens separately, and save yourself some money.
The lens is a solid lens. Affordable, versatile, and sharpest in its class. If you’re doing portraits with the a6000, it’s a must have.
MISCELLANEOUS OTHER THINGS YOU MIGHT NEED
SD Card: We prefer to shoot with a 64gb SD card, because it’s the absolute worst when you’re in the middle of a shoot and you run out of a storage. We probably have 10 different SD cards all spread out in random places, but this is the one we almost always use!

Reflector & Diffuser: The one that we use was actually a gift from Summer’s mom! Diffusers do a really great job with helping to diffuse out sun on super sunny days. Use reflectors to reflect light when you need a little extra help.
Tripod: We actually don’t use a tripod regularly, but this is helpful for anyone shooting alone.
SOFTWARE
This section will be short and sweet! We use Lightroom to edit pictures. Nothing super fancy. I actually can’t take credit for editing Summer’s pictures, though. Along with so many other talents, Summer edits all of her own pictures. However, for my freelance work I mostly use Lightroom to edit as well. Sometimes I use Photoshop when something more artistic is required, but more often than not I use Lightroom. I am fairly sure you can do everything on Photoshop that you can in Lightroom. I just think Lightroom is easier to use for my purposes. Here are the two things we do:
Low Aperture Lens: Use a low aperture lens to get a very blurry background. Also, while using that lens, we try to get as far away from the background as possible. The further the background, the blurrier it gets!
Over Expose Slightly: When taking the picture, we simply try to make it a little brighter. If we can’t get them to be sufficiently brighter when taking them, Summer does it later when editing them. I know that sounds kind of dumb, but that’s exactly what we do. If you want to know how take brighter pictures, Google aperture, shutter speed, and ISO! I should also mention that when we look for places and times to shoot, we always pay attention to lighting.
Lighting makes or breaks the picture as probably a lot of you guys already know! So, one of our biggest concerns is if the lighting is even. You can achieve even lighting in shade or a cloudy/overcast day. But that’s it, even lighting and over exposing just a little!
If you want to know how to edit pictures, I would say watch some YouTube videos over it. Editing is actually an absolute art and something that I know I can definitely improve in my own portfolio. The skills I do have in editing I gained from trial and error, YouTube, and Google. My biggest tip for editing with Lightroom or Photoshop is to start small because it can be overwhelming at first.

Well, that’s it! If you made it this far, thank you for sticking around & I hope that this helped by learning about what camera gear I use for blogging! This was my first blog post on here so I hope I did alright! If anyone has questions about any of this y’all can email me directly at akashkundu92@gmail.com. Summer doesn’t like talking about this stuff with me (she calls me a nerd.) If you have any questions don’t hesitate to ask because I really enjoy talking about this & helping where I can! Anyways, it’s past 4 AM and Summer and I are shooting tomorrow in the morning… So needless to say, I’m screwed. I did tell Summer I would have it done by tomorrow morning so I’m glad I did. Thanks for reading and goodnight!
I’ve been thinking of switching to the SONY. How do you like it?
– gita (mimiandchichi.com)
I’ve been thinking of switching to the SONY. How do you like it?
Such a thorough guide, love it! I always enjoy seeing what other gear bloggers use!
I love reading about what other camera gear people are using! Thanks for putting all of this helpful info together! I LOVE Sony cameras but have only used mine for video honestly… I’ll have to shoot photos with it more often!
xo, Shelby
http://www.prettyinthepines.com
These are such great tips! My husband and I are taking our camera on vacay with us next week so we can practice and get more comfortable with it!
xo, Sara
i need to step up my camera game ASAP!!!!!
I wish I felt more confident in my photography! Thanks for sharing these tips!
Thanks for sharing these tips! I have the Sony a6300 but still need to get better lenses for it. I also have a Canon DSLR but am looking to upgrade so I appreciate it.
xo, Laura
http://www.have-need-want.com
Thanks for sharing these tips!
Sabrina | Gypsy Tan
http://www.gypsytan.com